Jason Momoa Rocks the Hexagon Cardigan
A New Trend in Crochet Fashion
Jason Momoa, the larger-than-life star of "Aquaman" and "Game of Thrones," is known for his rugged good looks and adventurous spirit. Recently, he has been spotted wearing a unique and eye-catching piece: a hexagon-patterned crochet cardigan. This unexpected fashion choice has sparked interest and excitement in the crochet and fashion communities alike. Let's dive into why this cardigan is turning heads and how you can create your own version to stay on trend.
The Appeal of the Hexagon Cardigan
Hexagon cardigans are not just stylish; they also offer a unique geometric flair that sets them apart from more traditional patterns. The hexagon shape allows for creative and intricate designs that can be tailored to fit any style or preference. For Jason Momoa, known for his bold and unconventional fashion choices, the hexagon cardigan is a perfect match. Its structure and texture add a layer of depth to his already dynamic persona.
Creating Your Own Hexagon Cardigan
If you're inspired by Jason Momoa's fashion statement and want to crochet your own hexagon cardigan, here's a detailed guide to get you started.
Materials Needed:
Yarn: Choose a medium weight yarn in your preferred colors. You might need around 1000-1500 yards depending on the size.
Crochet Hook: A size H (5.0 mm) hook is typically suitable for this yarn weight.
Tapestry Needle: For weaving in ends.
Scissors: For cutting yarn.
Stitch Markers: To keep track of your stitches.
Abbreviations:
ch: Chain
cl: Cluster (3 double crochet together)
dc: Double Crochet
slst: Slip Stitch
sp: Space
rep: Repeat
FO: Fasten Off
Special Stitches:
Granny Square Decrease: Work 2 clusters together over 2 spaces.
Pattern Instructions:
Body Hexagons (make 2)
Round 1: Make a magic ring. Ch 3 (counts as first dc), 2 dc into ring, ch 2, cl, ch 2 into ring 5 times, sl st to top of beg ch 3 to join round. (6 clusters)
Round 2: Change Color. Ch 3, 2 dc in same ch-2 sp, ch 1, (cl, ch 2, cl) in next ch-2 sp, ch 1 rep from * 5 times, cl in next ch-2 sp, ch 2, sl st to beg ch 3 to join round. (12 clusters)
Round 3: Change Color. Ch 3, 2 dc in same ch-2 sp, ch 1, cl in next ch-1 sp, ch 1, (cl, ch 2, cl) in next ch-2 sp, ch 1, cl in next ch-1 sp, ch 1 rep from * 5 times, cl in next ch-2 sp, ch 2, sl st to beg ch 3 to join round. (18 clusters)
Begin Sleeve Decreases
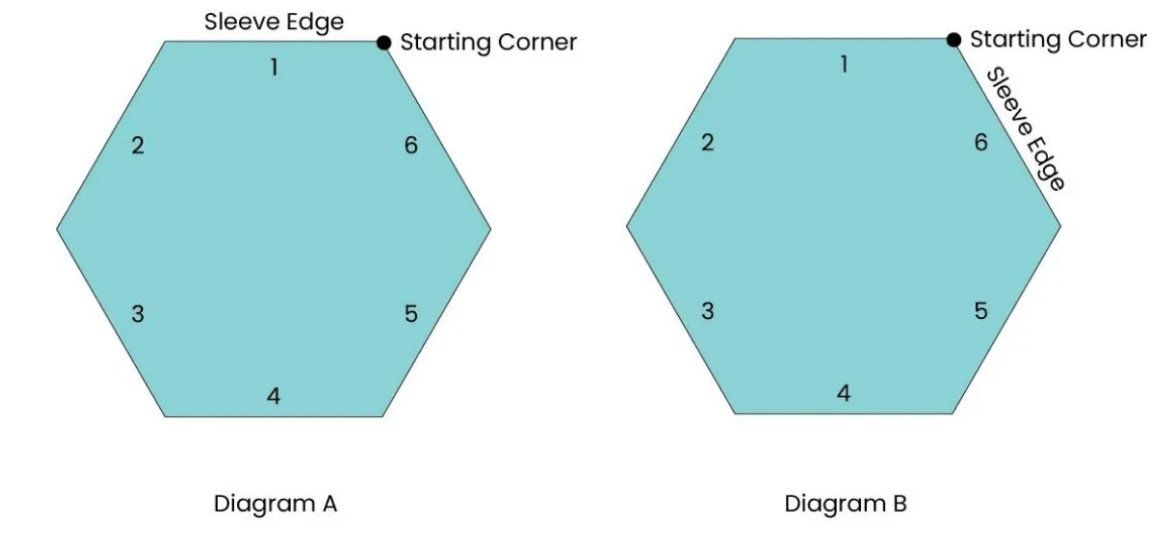
For the left hexagon: Place marker to designate Side 1 of the hexagon as the “Sleeve Edge.” Starting in Round 4, decrease 1 cluster at the center of Side 1 every third round.
For the right hexagon: Place marker to designate Side 6 of the hexagon as the “Sleeve Edge”. Starting in Round 4, decrease 1 cluster at the center of Side 6 every third round.
Round 4 LEFT: (Decrease Round) Change Color. Ch 3, 2 dc in same ch-2 sp, ch 1, Granny Square Decrease, ch 1, (cl, ch 2, cl) in next ch-2 sp, ch 1, (cl, ch 1) in each ch-1 sp to corner; rep from * 5 times, cl in next ch-2 sp, ch 2, sl st to beg ch 3 to join round.
Round 4 RIGHT: (Decrease Round) Change Color. Ch 3, 2 dc in same ch-2 sp, ch 1, (cl, ch 1) in each ch-1 sp to corner, (cl, ch 2, cl) in next ch-2 sp, ch 1; rep from * 5 times, Granny Square Decrease, ch 1, cl in next ch-2 sp, ch 2, sl st to beg ch 3 to join round.
Round 5: Change Color. Ch 3, 2 dc in same ch-2 sp, ch 1, (cl, ch 1) in each ch-1 sp to corner, (cl, ch 2, cl) in next ch-2 sp, ch 1; rep from * 5 times, (cl, ch 1) in each ch-1 sp to corner, cl in next ch-2 sp, ch 2, sl st to beg ch 3 to join round.
Round 6: Rep Round 5.
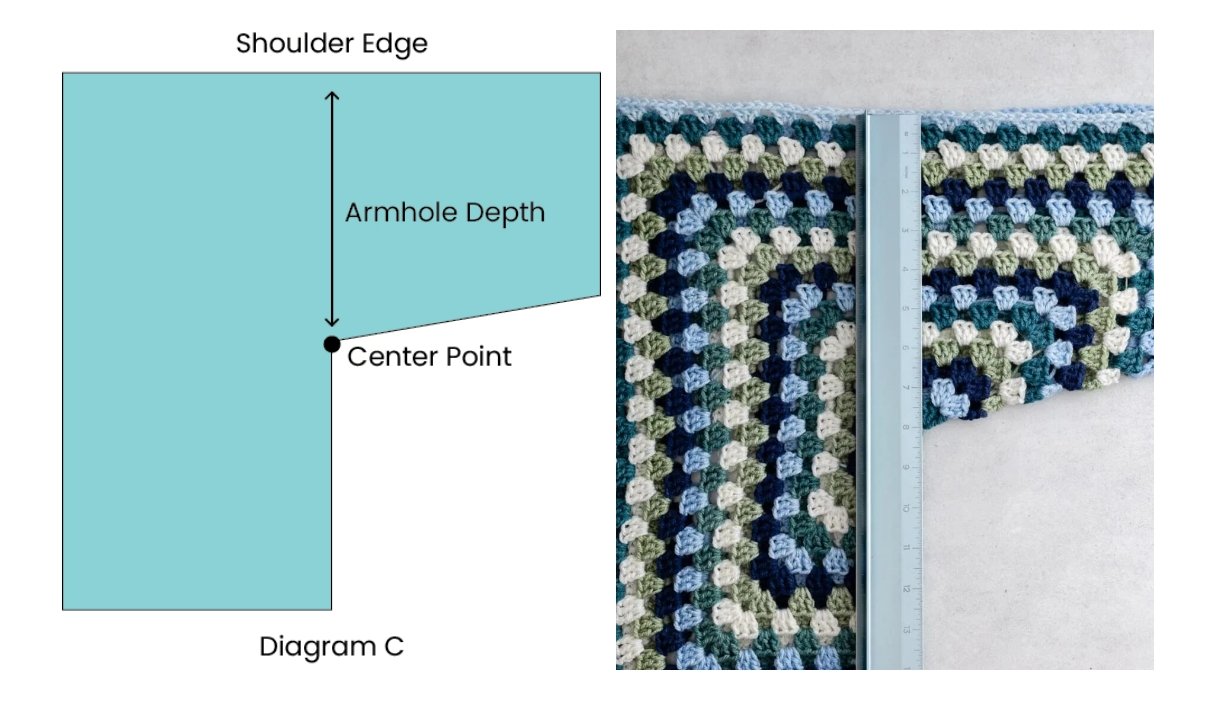
Rep rounds 4-6, decreasing every third round for a total of 13 (14, 15, 16, 17, 18, 19, 20, 21) rounds, or until under the Center Point to Shoulder Edge measures desired length.
To measure: fold each hexagon in half to form an L shape, as shown in Diagram C. The decreases will be situated on the bottom edge of the sleeve.
Then continue to the next section. Keep note of which round you ended with as you will repeat these rounds to add length to the sleeves after seaming the two hexagons together.
Adding Width to Center Back/Front and Length to Bottom
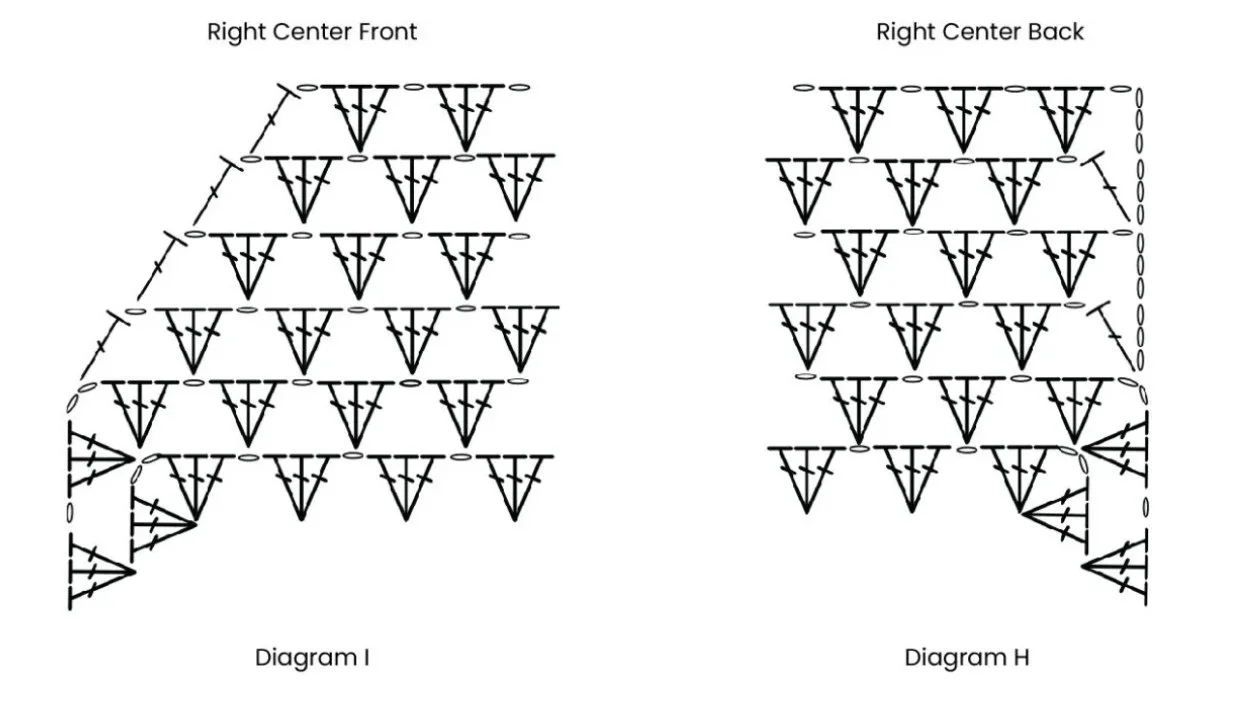
For left hexagon: You’ll start at the top of the Center Front edge, continue around the Bottom Edge, and back up the Center Back edge. You will decrease one cluster each row at the top of the Center Front edge to create a V neckline with a ch 4.
Row 1 LEFT: Change Color (attaching yarn in corner ch-2 sp). Ch 4, place stitch marker in ch 4, (cl, ch 1) in each ch-1 sp to corner, (cl, ch 2, cl) in next ch-2 sp, ch 1; rep from * 1 time, (cl, ch 1) in each ch-1 sp to corner, 2 dc in last ch-2 sp.
Row 2 LEFT: Change Color (attaching yarn in ch-4 sp). Ch 4, (cl, ch 1) in each ch-1 sp to corner, (cl, ch 2, cl) in next ch-2 sp, ch 1; rep from * 1 time, (cl, ch 1) in each ch-1 sp to corner, 1 dc in last dc.
Row 3 LEFT: Change Color (attaching yarn in corner ch-4 sp). Ch 4, (cl, ch 1) in each ch-1 sp to corner, (cl, ch 2, cl) in next ch-2 sp, ch 1; rep from * 1 time, (cl, ch 1) in each ch-1 sp to corner, 2 dc in last dc.
For right hexagon: You’ll start at the top of the Center Back edge, continue around the Bottom edge, and back up the Center Front edge. You’ll decrease one cluster each row at the top of the Center Front edge to create a V neckline with the last dc of round.
Row 1 RIGHT: Attach new yarn in corner ch-2 sp. Ch 3, dc in same ch-1 sp, ch 1 (cl, ch 1) in each ch-1 sp to corner, (cl, ch 2, cl) in next ch-2 sp, ch 1; rep from * 1 time, (cl, ch 1) in each ch-1 sp to last ch-sp, 1 dc in last ch-sp, place marker in dc.
Row 2 RIGHT: Attach new yarn in turning ch-3 from previous row. Ch 4, (cl, ch 1) in each ch-1 sp to corner, (cl, ch 2, cl) in next ch-2 sp, ch 1; rep from * 1 time, (cl, ch 1) in each ch-1 sp to last ch-sp, 1 dc in last ch-sp.
Row 3 RIGHT: Attach new yarn in ch-4-sp. Ch 3, dc in same ch-sp, ch 1 (cl, ch 1) in each ch-1 sp to corner, (cl, ch 2, cl) in next ch-2 sp, ch 1; rep from * 1 time, (cl, ch 1) in each ch-1 sp to last ch-sp, 1 dc in last ch-sp.
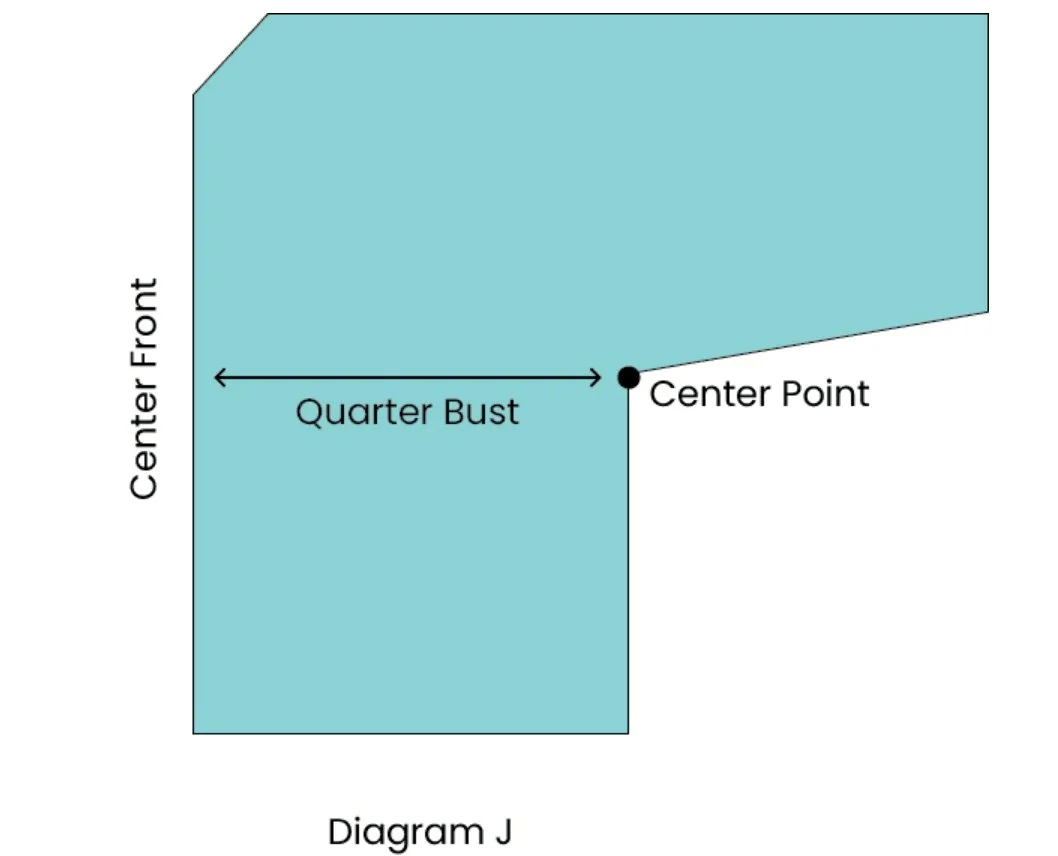
Repeat Rows 2 & 3, crocheting a total of 2 (3, 4, 5, 6, 7, 8, 9, 10) rows until Center Point to Center Front edge (see Diagram J) measures 7.5” (8.5”, 9.5”, 10.5”, 11.5”, 12.5”, 13.5”, 14.5”, 15.5”). FO and weave in ends.
Joining the Two Halves
Fold the two hexagons. Align center back edges. Seam the center back seam with a mattress stitch.
Seaming the Shoulders
Align shoulder seams and use a mattress stitch to seam together, making sure to end at the stitch markers. Once seamed, remove stitch markers.
Add Sleeve Length
Attach new yarn color with a sl st into ch-2 sp directly BEFORE beginning Ch 3 of the last round of the sleeve. Begin repeating rounds 4-6 of sleeve decreases, making sure to begin your round in the next consecutive round from where you ended previously.
In the first round only: When you come to the shoulder seam, work a granny decrease in the two ch-2 corner spaces on either side of the seam.
Rep rounds 4-6 of sleeve decreases for an additional desired rounds, or until sleeve edge measures 4” across (8 clusters). Rep round 5 until under the Underarm to Wrist measures desired length. FO and weave in ends.
Optional: Adding Length
At this point, you can choose to add additional rows to the bottom edge of the sweater to make it longer.
Row 1: Attach yarn to Bottom Edge in corner ch-2 sp. Ch 3, dc in same ch-1 sp, ch 1 *(cl, ch 1) in each ch-1 sp to corner, 2 dc in last ch-2 sp.
Row 2: Attach new yarn in first dc. Ch 4, *(cl, ch 1) in each ch-1 sp to corner, 1 dc in last dc.
Adding Ribbing
You’ll create 1.5 inches of sc-blo ribbing to the waistband, neckline, and sleeve cuffs. Ribbing instructions are the same for each section. However, starting placement is different.
Waistband Ribbing Attach yarn to Bottom Edge. sc evenly across, making sure to 1 sc in each dc and ch-sp. Follow Ribbing instructions below. FO and weave in ends.
Neckline Ribbing Attach yarn to Bottom Front Corner. sc evenly across, making sure to 1 sc in each dc and ch-sp up the front, around neckline, and down front. Follow Ribbing instructions below. FO and weave in ends.
Sleeve Cuff Ribbing Attach yarn to Sleeve Edge at Underarm. Sc evenly around, making sure to 1 sc in each dc and ch-sp. Join with a sl st. Follow Ribbing Instructions below. FO leaving a 12 in (30cm) tail to join ribbing with a mattress stitch. Weave in ends.
Ribbing Instructions
Ribbing Row 1: Ch 7. sc in second ch from hook and in each ch across, working back to cardigan body. sl st in next 2 sc. Turn, do not ch 1.
Ribbing Row 2: Starting in third st from hook (skipping over the two sl sts) sc-blo across. Turn.
Ribbing Row 3: Ch 1. sc-blo in each st across. sl st in next 2 sc. Turn, do not ch 1.
Rep Ribbing Rows 2 and 3 until ribbing is complete.
Finishing
Once complete, lightly steam block to finished measurements. Weave in ends and enjoy your new hexagon cardigan!
This pattern ensures you’ll have a trendy and stylish cardigan just like Jason Momoa’s. Happy crocheting!
-de Bresla


